Showing posts with label valentine's day. Show all posts

Thursday, February 2, 2012

Handmade


This Thursday, I'm thankful for my ability to create things. I'm even more thankful that I'm able to share this gift with my girls (and that they humor me, most of the time).

Some of our projects from the past year -


The girls made Valentine's cards with sponge stamps. 


C's Toy Story birthday cake with cake stand. 


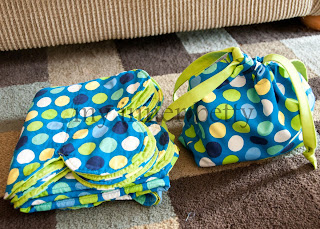
scalloped edge baby quilt and tie-top bag for my BFF's new baby boy


peach preserves - my first (on my own) canning experience


A's scrapbooking bag - She also attended her first crop this past fall! 


 This fantastic little cabinet was orange and yellow - really bright orange and yellow - before I got a hold of it. We saw it at Goodwill one Saturday morning, and I knew it would fit that little space perfectly! I left Adam at Goodwill with the instructions to guard it with his life while I ran home to measure the space. Thankfully he humored me, but told me no way was it going in our dining room in its fabulously circus-colored state. :) 


crayon wreath with A as a back-to-school project 


C's elephant costume!


A's horse birthday cake - it was made using the same pan my mom used for many of my birthday cakes! 


A's doll bed (an A & Adam project) and the bedding
plans for the bed here 


Christmas crafts with the girls


Possibly my favorite - this tree wall hanging. It was a Christmas gift for my mom made with fabric that had my been grandma's (her mom). Those leaves - that same fabric was her kitchen curtains. 

Monday, January 30, 2012

Shabby Heart Valentine's Day Shirt!

My big kid LOVES holidays. They're all special to her for unique reasons. Why does she love Valentine's Day? The pinks, reds, hearts, and love! So, she needs a special shirt for the special day, right? Of course!! (If we're being totally honest here, I love holidays too!)

Last year I made her a cut-out heart shirt and matching skirt. This year, I wanted to do a little something different. Plus, I'm still on my applique kick from the pillowcases. :)

I saw this adorable giraffe shirt here and knew that was going to be my technique this year!! Super easy and so fun!

My awesome husband came across some extra plain colored long sleeved T's while organizing the girls closet (that's a Daddy job around here, ya know? :) ), and I had a bunch of leftover fabric bits from my craft show projects... It's like this little shirt was really meant to be!


This is my first real tutorial. I'm waaaay better at talking than writing, so hopefully this is easy enough to follow. :)

To start out, you'll need a shirt (got mine from ON when they do all their crazy clearance sales at the end of the season), a pattern, fabric, fusible webbing (I used Heat & Bond), thread, sharp scissors, a ruler, a sewing machine, an iron, and a pencil.


You’ll want to lay your pattern onto your base fabric (the light pink and white striped here) to determine the size of your fabric pieces. I like to have some extra to work with, so I cut my fabric pieces a good amount larger than my pattern. 


Determine how far apart you want your stitch lines to be and draw them on the back of your base piece. Ultimately, I went with 1/2 inch increments. 


Stack your fabric pieces and pin them like there's no tomorrow!


 Now stitch along all of the lines you just drew.


(I didn't go the whole way to the edges of my fabric - just as little larger than my pattern.)


Next up - cutting! You're going to cut through the top 4 layers of fabric. DO NOT cut your base fabric! Start at one edge and work your way across.


When you're done, it should look something like this -


Now we need to apply the webbing. Trace your pattern (remember to reverse it if it's directional) onto the smooth side (paper side) of the webbing. 


Then iron it onto the back of your base fabric. 


Cut it out, peel the paper backing off, and determine the placement on your shirt. Iron it in place.


Carefully zigzag stitch around the outer edge of the heart. 


In order to achieve the shabby look, you need to wash and dry the shirt a few times. 


before


after


See how the edges are starting curl up so nicely? Another round or two in the washer, and it should be fabulous! 


Linked at: